
Using Data Queues in eFORMz (Director)
NOTE: For accessing Data Queues from within an eFORMz project, consult the following post: iSeries Data Queue
The Director Toolkit can use Data Queues from an iSeries in two ways for processing input.
Data Queue Paired with an Input Queue (OUTQ)
A Data Queue (DTAQ) can be associated with a Director Input Queue (aka “OUTQ”), so that when a spool file is placed in the Input Queue, the associated Data Queue wakes up the eFORMz Director queue so that it immediately processes the spool file. This is more efficient than frequent polling of the Input Queue and provides more real-time processing of the spool files.
Configuring an Input Queue for an associated Data Queue simply requires specifying the full path name of the Data Queue in the Input Queue definition. The dialog box below is for configuring a Remote iSeries queue, and it is almost identical to the dialog box for configuring a Local iSeries queue:
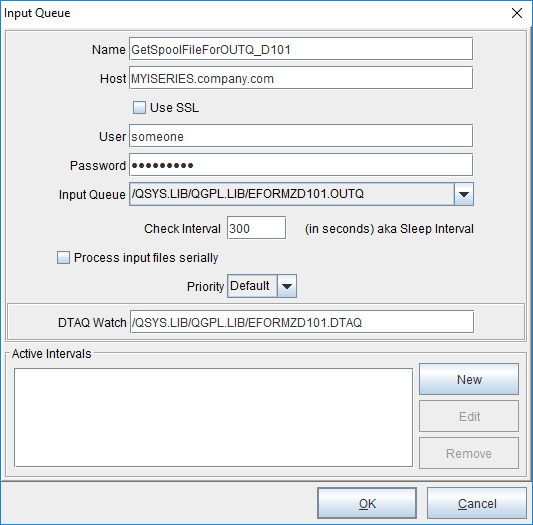
Enter the Data Queue path in the field labeled “DTAQ Watch”. In the example above, this path is:
/QSYS.LIB/QGPL.LIB/EFORMZD101.DTAQ
When you configure an Input Queue with an associated Data Queue, you can specify a relatively large value for the “Check interval”, since the Data Queue will cause the Input Queue to be called immediately when a spool file is placed in the Input Queue.
Data Queue as Mechanism for Passing Data to eFORMz
To process data from a Data Queue, a Director queue can be set up to monitor the Data Queue and process any data that is placed in the Data Queue, typically from an iSeries application. The steps to configure a Director queue to process a Data Queue are shown below. Note that when configuring a Data Queue, you never specify a polling interval; this is because the Data Queue immediately calls the Director queue when data is ready for processing, with no polling required.
In the Configure tab of the Director, select the root node of the configuration file. Then click the Add button on the right side of the window, and select the “iSeries Data Queue” from the popup menu:

Define Director Queue for Data Queue
Enter values for the fields in the “iSeries Data Queue” dialog box:
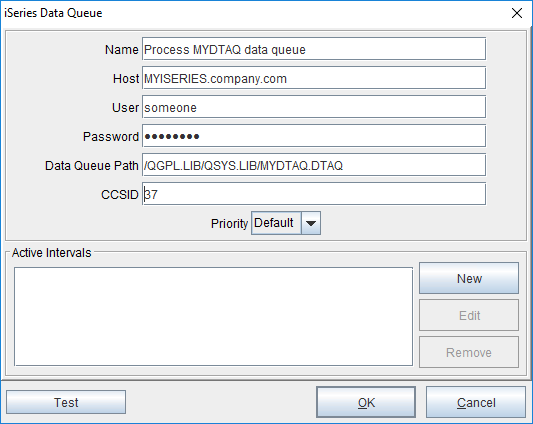
Name: A descriptive name for the Director queue
Host: The name or IP address of the iSeries box
User: user name for logging into the iSeries
Password: password for the user name
Data Queue Path: the fully qualified path to the Data Queue
CCSID (“coded character set identifier”): the code page to be used for reading data from the Data Queue.
Click OK to add this queue to the Director.
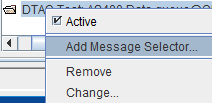
Add Message Selector for Data Queue
Right click on the Data Queue just added, and select the “Add Message Selector…” command from the popup menu:
Enter values for the fields on the “Message Selection” dialog box:
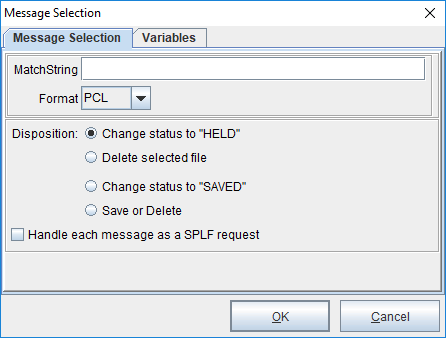
MatchString: A regular expression which is run against up to the first 2,000 characters in the message. If the message in the Data Queue matches the MatchString, it will be processed; otherwise, it will be ignored.
Format: Select a value from the Format dropdown list, specifying the expected format of the data.
Disposition: Select an option for the Disposition. We recommend “Delete selected file” to delete the message from the Data Queue after processing.
Handle each message as a SPLF request: Non-SPLF messages can currently only be handled as text strings. The SPLF messages include some binary components. This flag enabled correct interpretation of the message data.
Click OK to save the message selection parameters.
Select an eFORMz Project to Process the Data
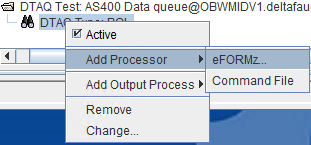
With the message selector in place, right click on it and select “Add Processor”, then “eFORMz…”
Select an eFORMz project to process the message from the Data Queue.
From this point, configuring the Director queue is just like configuring a Director queue to process input from a local directory. After configuration is complete, the Director queue might look like this:
